XAML being XML-based, it needs to be parsed and processed when the code is loaded in the application. WPF allows multiple scenarios, for example pre-compiling the XAML to BAML (binary application markup language), which is usually embedded into an assembly. This speeds up loading time, of course. Another option is to leave the unprocessed, uncompiled XAML file on the server (or in the “bin” folder of the application), and to load that file on demand when it is needed. This step involves the conversion from XAML (a text-format) to a stream, then converting the stream to a collection of XML nodes, and then using these XML nodes to build the actual WPF objects [1]. This all takes time.
One way to speed up this process is to clean up the XAML code. All the WPF controls’ properties have default values. By knowing what these default values are, you can write less XAML code, and this code you don’t write won’t parsed! This is a win-win situation. The only disadvantage of this is that we have to rely on Microsoft never changing what the default values are. Changing a default value for a public property is a breaking change, so we’re pretty confident that it won’t happen.
Let’s take an example:
<Button BorderBrush="#FF003C74"
    Foreground="#FF000000"
    Visibility="Visible"
    BorderThickness="0,0,0,0"
    HorizontalAlignment="Stretch"
    Margin="0,0,0,0"
    VerticalAlignment="Stretch"
    Width="Auto"
    Height="Auto"
    Grid.Column="0"
    Grid.ColumnSpan="1"
    Grid.Row="0"
    Grid.RowSpan="1"
    Panel.ZIndex="0" RenderTransformOrigin="0.5,0.5">
    <Button.Background>
        <LinearGradientBrush EndPoint="0.5,1" StartPoint="0.5,0">
            <GradientStop Color="#FFFFFFFF" Offset="0"/>
            <GradientStop Color="#FFE3E5F0" Offset="0.5"/>
            <GradientStop Color="#FFC6C5D7" Offset="1"/>
        </LinearGradientBrush>
    </Button.Background>
    <Button.RenderTransform>
        <TransformGroup>
            <ScaleTransform ScaleX="1" ScaleY="1"/>
            <SkewTransform AngleX="0" AngleY="0"/>
            <RotateTransform Angle="0"/>
            <TranslateTransform X="0" Y="0"/>
        </TransformGroup>
    </Button.RenderTransform>
    <Button.LayoutTransform>
        <TransformGroup>
            <ScaleTransform ScaleX="1" ScaleY="1"/>
            <SkewTransform AngleX="0" AngleY="0"/>
            <RotateTransform Angle="0"/>
            <TranslateTransform X="0" Y="0"/>
        </TransformGroup>
    </Button.LayoutTransform>
</Button>
Long XAML code
<Button/>Short XAML code
The two XAML snippets above are producing exactly the same result. One can immediately see the advantage of using the short form: The readibility is much better (don’t forget that many developers will actually *read* the XAML code, even if it’s produced by tools like Blend), and there is much less code to parse, so the loading time will be faster.
A good way to clean up XAML code is to use Expression Blend’s properties pane. In this tool, it’s easy to see which properties have been explicitly set in the XAML code. It’s also easy to try resetting them, to see if the value is the same as the default property. Let’s show how:
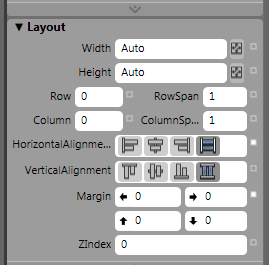
Expression Blend properties pane
Notice the small white square next to the “Margin” property and to the “HorizontalAlignment” property. This square is however empty next to the “VerticalAlignment” property. The meaning of this is: “Margin” has been set to “0,0,0,0” and HorizontalAlignment has been set to “Stretch”. However, VerticalAlignment has not been set in the XAML code. [2]
By clicking on this square, a context menu appears, and it is possible to reset the value to its default:
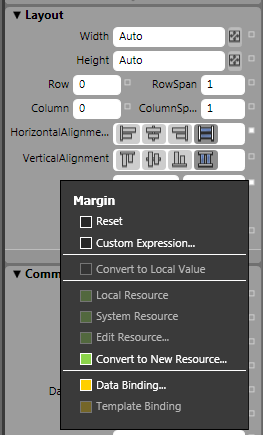
After resetting the property, we see that the value is still “0,0,0,0”, which clearly shows that the layout will not change.
I usually don’t spend too much time resetting properties to the default value while I am developing. However, before delivering code, I like to load it one last time in Expression Blend and to “polish” the design. One important step during the “polish” is to check that all the properties are set to default wherever possible. By doing so, I deliver cleaner, shorter code, which I consider an advantage for the project.
[1] Disclaimer: I am not 100% sure that it’s how it happens, it’s just what makes sense to me 🙂
[2] The small square can also take other colors: For example, green means “Resource”. Yellow means “Binding”. For more information, check the Expression Blend documentation
Visual Studio “reformat” feature
One of the features I like in Visual Studio is the “reformat” button. In Studio’s Options, there are multiple setting which affect the way the code looks when you type it. Let’s take a look at the “Tools / Options / Text Editor / XAML” options (these are the options for Visual Studio 2008. In VS2005 they are slightly different).
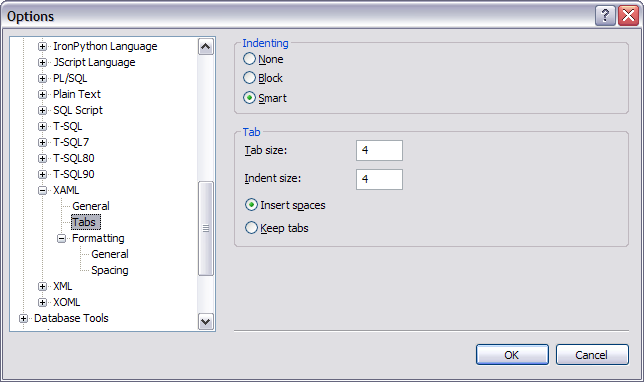
Visual Studio “XAML / Tabs” options
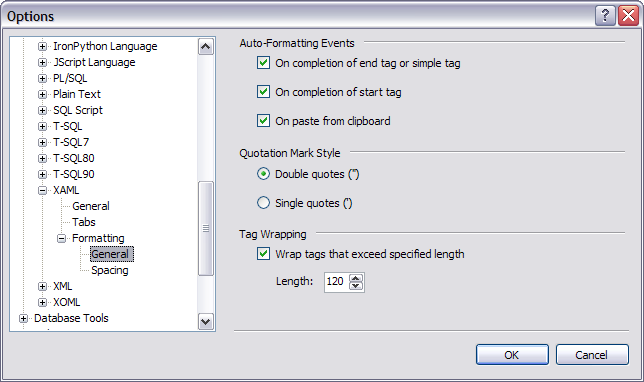
Visual Studio “XAML / Formatting / General” options
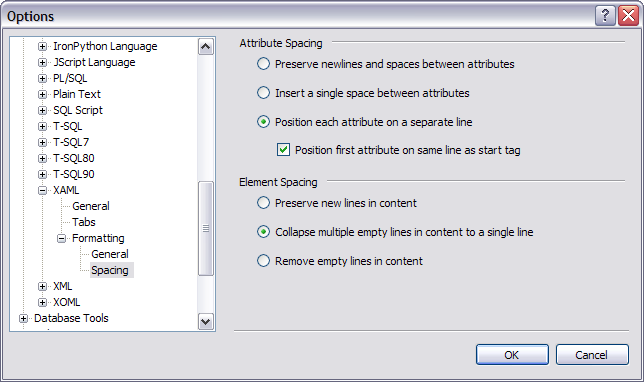
Visual Studio “XAML / Formatting / Spacing” options
The settings shown above (which are also the settings we prescribe in our XAML guidelines) allow reformatting a XAML file very easily. For example, the code here under is a direct output from Expression Blend (not formatted). After clicking on the button “Format the whole document” in Studio (or pressing Ctrl-K, Ctrl-D), the code is presented in a much more readable way.
<Window
    xmlns="http://schemas.microsoft.com/winfx/2006/xaml/presentation"
    xmlns:x="http://schemas.microsoft.com/winfx/2006/xaml"
    x:Class="UntitledProject1.Window1"
    x:Name="Window"
    Title="Window1"
    Width="640" Height="480" xmlns:d="http://schemas.microsoft.com/expression/blend/2006" xmlns:mc="http://schemas.openxmlformats.org/markup-compatibility/2006" mc:Ignorable="d">

    <Grid x:Name="LayoutRoot">
        <Grid.ColumnDefinitions>
            <ColumnDefinition Width="0.157*"/>
            <ColumnDefinition Width="0.152*"/>
            <ColumnDefinition Width="0.691*"/>
        </Grid.ColumnDefinitions>
        <Grid.RowDefinitions>
            <RowDefinition Height="0.148*"/>
            <RowDefinition Height="0.168*"/>
            <RowDefinition Height="0.684*"/>
        </Grid.RowDefinitions>
        <Button d:LayoutOverrides="Width" HorizontalAlignment="Left" Margin="27.8,48.008,0,0" VerticalAlignment="Top" Content="Button" Grid.Column="2" Grid.Row="2"/>
    </Grid>
</Window>
Unformatted XAML code (output from Blend)
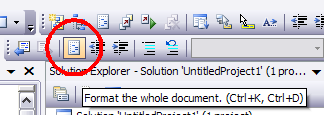
Button “Format the whole document”
<Window
    xmlns="http://schemas.microsoft.com/winfx/2006/xaml/presentation"
    xmlns:x="http://schemas.microsoft.com/winfx/2006/xaml"
    x:Class="UntitledProject1.Window1"
    x:Name="Window"
    Title="Window1"
    Width="640"
    Height="480"
    xmlns:d="http://schemas.microsoft.com/expression/blend/2006"
    xmlns:mc="http://schemas.openxmlformats.org/markup-compatibility/2006"
    mc:Ignorable="d">

    <Grid x:Name="LayoutRoot">
        <Grid.ColumnDefinitions>
            <ColumnDefinition Width="0.157*"/>
            <ColumnDefinition Width="0.152*"/>
            <ColumnDefinition Width="0.691*"/>
        </Grid.ColumnDefinitions>
        <Grid.RowDefinitions>
            <RowDefinition Height="0.148*"/>
            <RowDefinition Height="0.168*"/>
            <RowDefinition Height="0.684*"/>
        </Grid.RowDefinitions>
        <Button d:LayoutOverrides="Width"
                HorizontalAlignment="Left"
                Margin="27.8,48.008,0,0"
                VerticalAlignment="Top"
                Content="Button"
                Grid.Column="2"
                Grid.Row="2"/>
    </Grid>
</Window>
XAML code after “one click” formatting

