As consumers of your Visual Studio extensions start to move over to VS 2013, you will have to upgrade the Visual Studio extensions you build for Visual Studio 2012 to Visual Studio 2013 and republish to the Visual Studio extension gallery. Failing which, it will not be possible for your consumers to install and use your extensions on Visual Studio 2013.
Objective
In this blog post, I’ll show you how simple it is to upgrade your Visual Studio 2012 extension to Visual Studio 2013. There aren’t any reported breaking changes between VS 2012 SDK and VS 2013 SDK, the upgrade usually involves, rebuilding the extension against VS 2013 SDK and updating the vsix manifest file.

Walkthrough
- Download the Visual Studio 2013 SDK – You will need to download the Visual Studio 2013 SDK in order to open up the Visual Studio extension project in Visual Studio 2013. The SDK can be downloaded from here. Install the SDK before you proceed.
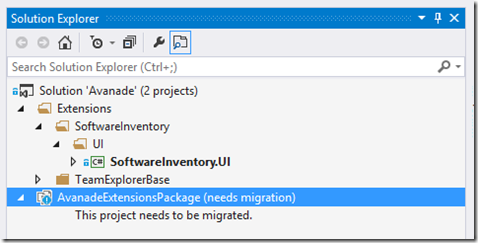
2. Once the VS 2013 SDK has been installed, open up your package project. For the purposes of this blog post, I’ll open up the Avanade Extension – Software Inventory in Visual Studio 2013. You will notice that Visual Studio doesn’t load the project but let’s you know that the project needs to be Migrated.
3. Right click the project and choose the option ‘Reload Project’ from the Context Menu.

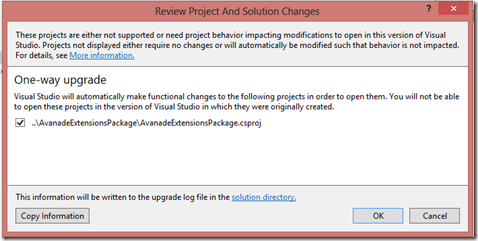
4. Choosing the Reload Project option brings up an upgrade window, telling you that the upgrade is a one way only upgrade i.e. the project will be changed to work with Visual Studio 2013 and you will not be able to open the project up in Visual Studio 2012. My recommendation would be to create a Visual Studio 2013 branch and upgrading the project in that branch only, so if you need to go back to Visual Studio 2012 project at some point, you have a handy reference in a separate branch.
5. Upon clicking Ok, the project is updated. See below, the following changes are made at the time of upgrade,
– The runtime version is updated in the Resources.Designer.cs file

– The Minimum version of Visual Studio in the package project file is changed from 11.0 to 12.0

6. Reference VS 2013 dll’s rather than VS 2012 dll’s. So reference Microsoft.TeamFoundation.Client.dll and Microsoft.TeamFoundation.Controls.dll from
C:\Program Files (x86)\Microsoft Visual Studio 12.0\Common7\IDE\ReferenceAssemblies\v2.0 and C:\Program Files (x86)\Microsoft Visual Studio 12.0\Common7\IDE\ReferenceAssemblies\v4.5. If you have any other API references, then change the references to point to VS 2013 instead of VS 2012.

7. Rebuild your solution to ensure there are no breaking changes. Success!

8. Update VSIX Manifest file (the file source.extnsion.vsixmanifest contains the meta data for your VSIX).
– Update the Install Targets from 11.0 to 12.0. This basically enforces that the extension can be installed on Visual Studio 2013 version of Visual Studio.


– Update the Dependencies from Visual Studio MPF 11.0 to Visual Studio MPF 12.0

9. Rebuild the solution and open up the bin folder for the Package project and look for the file *.vsix file [Microsoft Visual Studio Extension].
– This is basically the installer for your extension.

– Double click the installer to launch the installer wizard. Viola! You can see the package installation wizard opens up and gives you the option to install the extension for Visual Studio 2013.

– Click Install to Continue

– Note – If you run into the exception “23/06/2013 10:42:18 – Install Error : Microsoft.VisualStudio.ExtensionManager.InstallByMsiException: The InstalledByMSI element in extension Avanade Extensions cannot be ‘true’ when installing an extension through the Extensions and Updates Installer. The element can only be ‘true’ when an MSI lays down the extension manifest file.” Ensure you have the option “This VSIX is installed by Windows Installer” unchecked in the Install Targets tab.
10. Verifying that the extension has installed correctly.
– Open Extension Manager and verify that the installed extension shows up in the extension manager “list of installed VSIX”.

11. First Look at the updated Extension

– The links have now been moved to the context menu, so to see the navigation links, you’ll have to right click on the icon and select the option from the context menu.


Note – The Avanade Extension being used in the demo has been developed by Utkarsh and Tarun. The Software Inventory Extension for Visual Studio 2012… allows you to see the list of Software installed on the hosted build server right from with in Visual Studio, the extension also allows you to export this list to excel. More details on how this has been implemented can be found here.
I hope you found this useful. In case you have any questions or feedback, feel free to reach out on Visual Studio extensibility MSDN forums or via Microsoft Visual Studio feedback forum. Thank you for taking the time out and reading this blog post. If you enjoyed the post, remember to subscribe to http://feeds.feedburner.com/TarunArora. Stay tuned!
Posted on Thursday, June 27, 2013 1:22 AM VS2013 , TFS2013 | Back to top
–

