
There are times that we need to prompt the users when doing certain actions on the page. One practical example is to confirm the user when deleting a certain record just like what I have demonstrated awhile back about Displaying a Confirmation Message on GridView Deleting. If you noticed on that demo I simply use plain JavaScript to display the confirmation message. In this post I’m going to demonstrate how to use the ConfirmBox control in delete scenario.
Note that just for the simplicity of this demo I’m just going to create a dummy data as the DataSource for the GridView. If you are working with live data from database then you may want to check these previous articles about:
- GridView Insert, Edit, Update and Delete – The Ado.Net way - If using BoundField Columns
- Adding Rows in GridView with Edit, Update and Delete Functionality - If using TemplateField Columns
To get started let’s go ahead and set up the UI (HTML mark-up). For simplicity I set up the mark-up like this:
<%@ Page Title="" Language="C#" MasterPageFile="~/Site.Master" AutoEventWireup="true" CodeBehind="GridView.aspx.cs" Inherits="WebAppDemo.GridView" %> <%@ Register Assembly="AjaxControlToolkit" Namespace="AjaxControlToolkit" TagPrefix="asp" %> <%@ Register assembly="ProudMonkey.Common.Controls" namespace="ProudMonkey.Common.Controls" tagprefix="cc1" %> <asp:Content ID="Content1" ContentPlaceHolderID="HeadContent" runat="server"> </asp:Content> <asp:Content ID="Content2" ContentPlaceHolderID="MainContent" runat="server"> <asp:ToolkitScriptManager ID="ToolkitScriptManager1" runat="server" > </asp:ToolkitScriptManager> <cc1:ConfirmBox ID="ConfirmBox1" runat="server" /> <asp:Label ID="lblMessageDisplay" runat="server" ForeColor="Green" /> <asp:GridView ID="GridView1" runat="server" AutoGenerateColumns="False" > <Columns> <asp:BoundField DataField="ID" /> <asp:BoundField DataField="ProductName" HeaderText="Product Name" /> asp:TemplateField\ <ItemTemplate> <asp:TextBox ID="txtPrice" runat="server" Text='<%# Eval("Price") %>' /> </ItemTemplate> </asp:TemplateField> asp:TemplateField\ <ItemTemplate> <asp:TextBox ID="txtAmount" runat="server" Text='<%# Eval("Amount") %>' /> </ItemTemplate> </asp:TemplateField> asp:TemplateField\ <ItemTemplate> <asp:Button ID="btnDelete" runat="server" Text="Delete" OnClientClick="ShowConfirmBox(this,'Are you sure?');return false;" onclick="BtnDelete_Click" /> </ItemTemplate> </asp:TemplateField> </Columns> </asp:GridView> </asp:Content>
Obviously the page above make use of MasterPage and basically contains the ToolScriptManager, ConfirmBox, Label and GridView. The ToolScriptManager is necessary since the ConfirmBox control uses the ASP.NET Ajax Modal popup control. The Label is just for displaying the message and the GridView is for displaying the data.
Here’s the whole code behind part of the demo:
using System; using System.Web.UI.WebControls; using System.Data;
namespace WebAppDemo { public partial class GridView: System.Web.UI.Page {
private DataTable GetSampleData {
//NOTE: THIS IS JUST FOR DEMO //If you are working with database //You can query your actual data and fill it to the DataTable DataTable dt = new DataTable; DataRow dr = null;
//Create DataTable columns dt.Columns.Add(new DataColumn("ID", typeof(string))); dt.Columns.Add(new DataColumn("ProductName", typeof(string))); dt.Columns.Add(new DataColumn("Price", typeof(string))); dt.Columns.Add(new DataColumn("Amount", typeof(string)));
//Create Row for each columns dr = dt.NewRow; dr["ID"] = 1; dr["ProductName"] = "Proudct 1"; dr["Price"] = "100"; dr["Amount"] = "10";
dt.Rows.Add(dr);
dr = dt.NewRow; dr["ID"] = 2; dr["ProductName"] = "Product 2"; dr["Price"] = "200"; dr["Amount"] = "2";
dt.Rows.Add(dr);
dr = dt.NewRow; dr["ID"] = 3; dr["ProductName"] = "Product 3"; dr["Price"] = "50"; dr["Amount"] = "10";
dt.Rows.Add(dr); return dt; }
private void BindGrid(DataTable source) { GridView1.DataSource = source; GridView1.DataBind; }
private DataTable UpdateTable(DataTable source, int rowIndex) { for (int i = 0; i < GridView1.Rows.Count; i++) { TextBox tb1 = (TextBox)GridView1.Rows[i].Cells[2].FindControl("txtPrice"); TextBox tb2 = (TextBox)GridView1.Rows[i].Cells[3].FindControl("txtAmount"); source.Rows[i]["Price"] = tb1.Text; source.Rows[i]["Amount"] = tb2.Text; } source.Rows.RemoveAt(rowIndex); return source; }
protected void Page_Load(object sender, EventArgs e) { if (!IsPostBack) { ViewState["COPY"] = GetSampleData; BindGrid(GetSampleData); } }
protected void BtnDelete_Click(object sender, EventArgs e) { if (ViewState["COPY"]!= null) { DataTable dt = (DataTable)ViewState["COPY"]; Button btnDelete = (Button)sender; GridViewRow gvRow = (GridViewRow)btnDelete.NamingContainer; BindGrid(UpdateTable(dt, gvRow.RowIndex));
lblMessageDisplay.Text = "Record deleted!"; } } } }
Since I didn’t use database for storing the data you may notice that I use ViewState to store the data across postbacks as you see in Page_Load event. The UpdateTable method is responsible for handling the deletion. You may also notice that before the row is being removed it updates first the data, this is to ensure that the data on the TextBox are retained on postbacks.
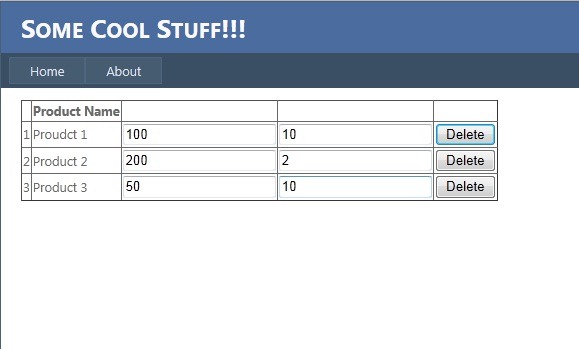
Here’s the page output when you run the code.
Initial load
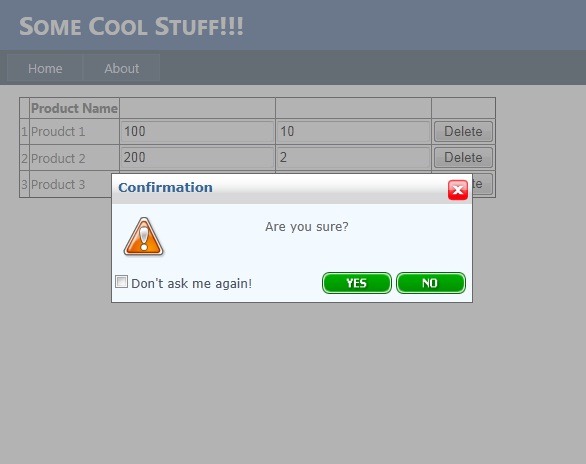
After clicking the Delete button
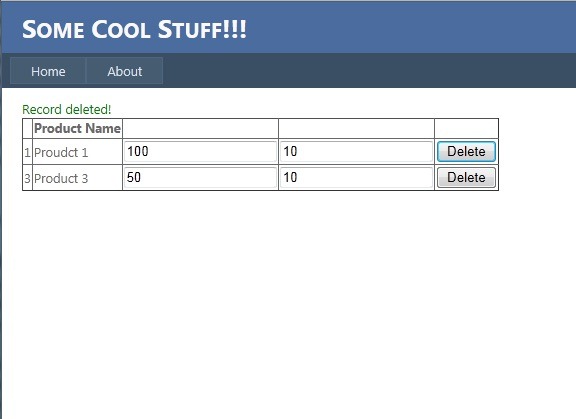
After clicking the YES button
Enjoy!!!
Technorati Tags:,