
So, I got a comment yesterday on my post about Extending Blend 4 and Blend for Visual Studio 2012 asking if I knew how to get it working for Blend for Visual Studio 2013..
My initial thoughts were, just change the location to get the blend dlls from Visual Studio 11.0 to 12.0 and you’re all set, so I went to do that, only to discover that the dlls I normally reference, well – they don’t exist. So… I’ve made a presumption that the actual process of using MEF etc is still the same. I was wrong.
So, the route to discovery – required DotPeek and opening a few of blends dlls..
Browsing through the Blend install directory (./Microsoft Visual Studio 12.0/Blend/) I notice the .addin files:

So I decide to peek into the SketchFlow dll, then promptly remember SketchFlow is quite a big thing, and hunting through there is not ideal, luckily there is another dll using an .addin file, ‘Microsoft.Expression.Importers.Host’, so we’ll go for that instead.
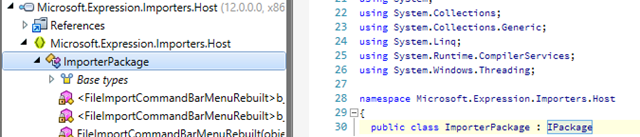
We can see it’s still using the ‘IPackage’ formula, but where is that sucker? Well, we just press F12 on the ‘IPackage’ bit and DotPeek takes us there, with a very handy comment at the top:
// Type: Microsoft.Expression.Framework.IPackage // Assembly: Microsoft.Expression.Framework, Version=12.0.0.0, Culture=neutral, PublicKeyToken=b03f5f7f11d50a3a // MVID: E092EA54-4941-463C-BD74-283FD36478E2 // Assembly location: C:\Program Files (x86)\Microsoft Visual Studio 12.0\Blend\Microsoft.Expression.Framework.dll
Now we know where the IPackage interface is defined, so let’s just try writing a control.
Last time I did a separate dll for the control, this time I’m not, but it still works if you want to do it that way.
Let’s build a control!
STEP 1
Create a new WPF application
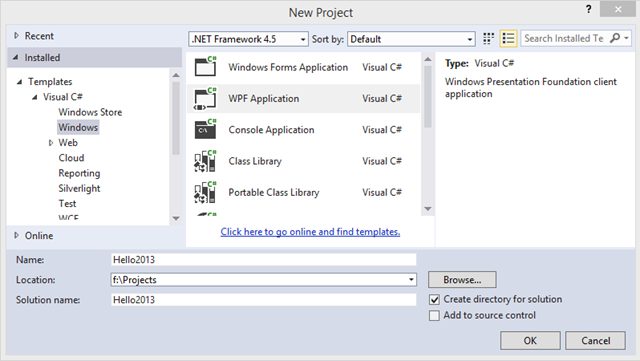
Naming doesn’t matter any more! I have gone with ‘Hello2013’ (see what I did there?)
STEP 2
Delete:
- App.Config
- App.xaml
- MainWindow.xaml
We won’t be needing them
STEP 3
Change your application to be a Class Library instead.
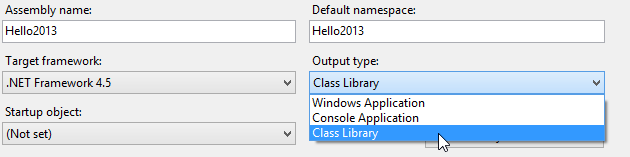
(You might also want to delete the ‘vshost’ stuff in your output directory now, as they only exist for hosting the WPF app, and just cause clutter)
STEP 4
Add a reference to the ‘Microsoft.Expression.Framework.dll’ (which you can find in ‘C:\Program Files\Microsoft Visual Studio 12.0\Blend’ – that’s Program Files (x86) if you’re on an x64 machine!).
STEP 5
Add a User Control, I’m going with ‘Hello2013Control’, and following from last time, it’s just a TextBlock in a Grid:
<UserControl x:Class="Hello2013.Hello2013Control" xmlns="http://schemas.microsoft.com/winfx/2006/xaml/presentation" xmlns:x="http://schemas.microsoft.com/winfx/2006/xaml" xmlns:mc="http://schemas.openxmlformats.org/markup-compatibility/2006" xmlns:d="http://schemas.microsoft.com/expression/blend/2008" mc:Ignorable="d" d:DesignHeight="300" d:DesignWidth="300"> <Grid> <TextBlock>Hello Blend for VS 2013</TextBlock> </Grid> </UserControl>
STEP 6
Add a class to load the package – I’ve called it – yes you guessed – Hello2013Package, which will look like this:
namespace Hello2013 { using Microsoft.Expression.Framework; using Microsoft.Expression.Framework.UserInterface;
public class Hello2013Package : IPackage
{
    private Hello2013Control \_hello2013Control;
    private IWindowService \_windowService;

    public void Load(IServices services)
    {
        \_windowService = services.GetService<IWindowService>();
        Initialize();
    }

    private void Initialize()
    {
        \_hello2013Control = new Hello2013Control();
        if (\_windowService.PaletteRegistry\["HelloPanel"\] == null)
            \_windowService.RegisterPalette("HelloPanel", \_hello2013Control, "Hello Window");
    }

    public void Unload(){}
}
}
You might note that compared to the 2012 version we’re no longer [Exporting(typeof(IPackage))]. The file you create in STEP 7 covers this for us.
STEP 7
Add a new file called: ‘<PROJECT_OUTPUT_NAME>.addin’ – in reality you can call it anything and it’ll still read it in just fine, it’s just nicer if it all matches up, so I have ‘Hello2013.addin’. Content wise, we need to have:
obviously, replacing ‘Hello2013.dll’ with whatever your dll is called. ## STEP 8 We set the ‘addin’ file to be copied to the output directory: [](/images/cskardon/extending-blend-for-visual-studio-2013/47bb1a46-image_12.png) ## STEP 9 Build! ## STEP 10 Go to your output directory (./bin/debug) and copy the 3 files (Hello2013.dll, Hello2013.pdb, Hello2013.addin) and then paste into the ‘Addins’ folder in your Blend directory (C:\\Program Files\\Microsoft Visual Studio 12.0\\Blend\\Addins) ## STEP 11 Start Blend for Visual Studio 2013 ## STEP 12 Go to the ‘Window’ menu and select ‘Hello Window’ [](/images/cskardon/extending-blend-for-visual-studio-2013/1778f9f3-image_14.png) ## STEP 13 Marvel at your new control! [](/images/cskardon/extending-blend-for-visual-studio-2013/9bbd0c39-image_16.png) Feel free to email me / comment with any problems!