
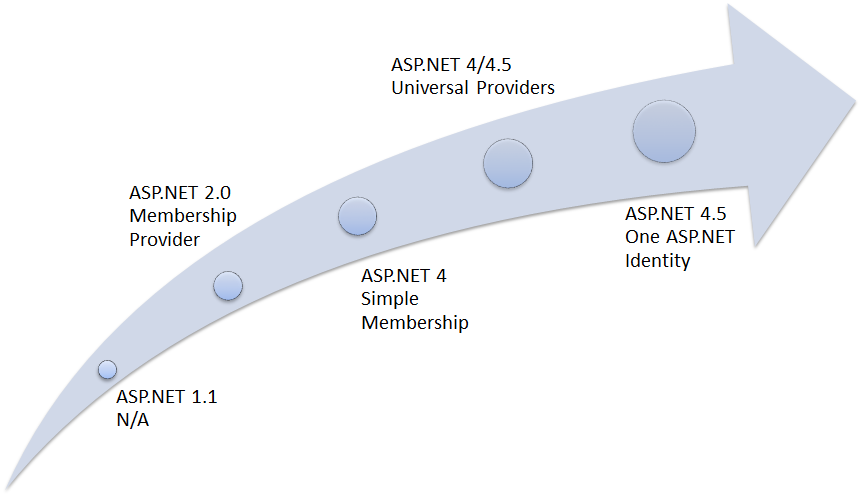
 If you’ve been working with ASP.NET for any amount of time building web applications, you’ve probably used the user login features that have been a part of the framework. Introduced in 2005 with .NET 2.0 including what is called the Provider Model, all we needed to do to authenticate users in our app was to add the login control to our Web Forms project and click run. The framework performed some magic, created a local database with the right schema and we’re in business with authenticating users.
While easy to get started and declarative in nature, the original identity system also had some limitations and challenges that as the web evolved needed to be addressed. Things like customizing the user profile required deeply embracing a rather fragile schema and working thru several configuration steps in the web.config. Adding 3rd party identity in addition to local identity was not easy because the way the IIS implemented the authentication modules for us.
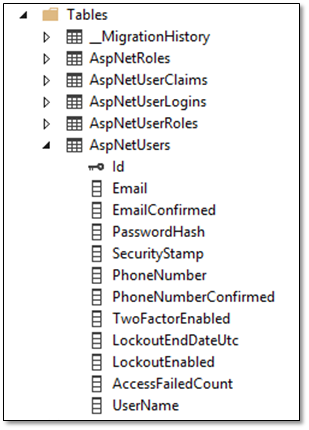 In 2012 there was the introduction of the Simple Membership Provider whWhen tich started down the path of opening the floodgates to alternate authentication flows, but the next year they changed course to release the new identity framework which is built on a simple, but easily extendible, data model with features built in to support things like 2 factor authentication, email and phone confirmation, as well as several other features.
In Visual Studio 2013 templates were added for the MVC style application to use identity, and in Update 4 they added templates for Win Forms. These templates require a little understanding and work to implement the features, but one piece of functionality that’s missing is a User Administration page to manage which roles a user is in. I propose to offer a bare-bones start to what is involved in building that and adding it to your application.
Let’s begin with the model. The ApplicationUser class implemented in the AppStart inherits from IdentityUser, which in turn inherits a number of interfaces from IUser that provide the data framework of a user. The user class then includes things like email, phone number and if they’re confirmed, as well as a count of the number of access attempts and if it’s locked out, as well as a collection of claims, collection of logins and a collection of roles. The templates for a new MVC application also include an AccountController, which handles user registration and login, and a ManageController which allows the user to edit their own security settings. You can look at these to see how they handle the logic of going from a user account to editing the features enabled for it. (See http://asp.net/identity for articles and tutorials for working with the features).
Since Authentication is used to identify a user, but Authorization is how we grant access to our application’s resources, let’s focus on what we need to add to allow you to manage which users are in various application roles. I’ve uploaded the sample application code to www.benkotips.com/downloads but will highlight key things in it here. The core things to know about how identity 2.0 is implemented is this:
- When the application starts it runs the logic in Startup.cs which initializes things with a call to ConfigureAuth(app).
- The App_Start folder includes StartupAuth.cs which configures the OWIN context to include our authentication stuff
- If this is the first time the app is run Entity Framework will initialize a database for our use which will contain the identity schem
To handle User Administration I approached it by adding a new controller for the admin purposes, and instrumented it with 2 routes. The first returns a list of users, and using an extension I added to the ApplicationUser class to include a read only property that is a list of the roles a user is in. When they click Edit they are presented with a list of checkboxes with the list of roles available. Checking these and clicking save updates the user record and returns to the list of users.
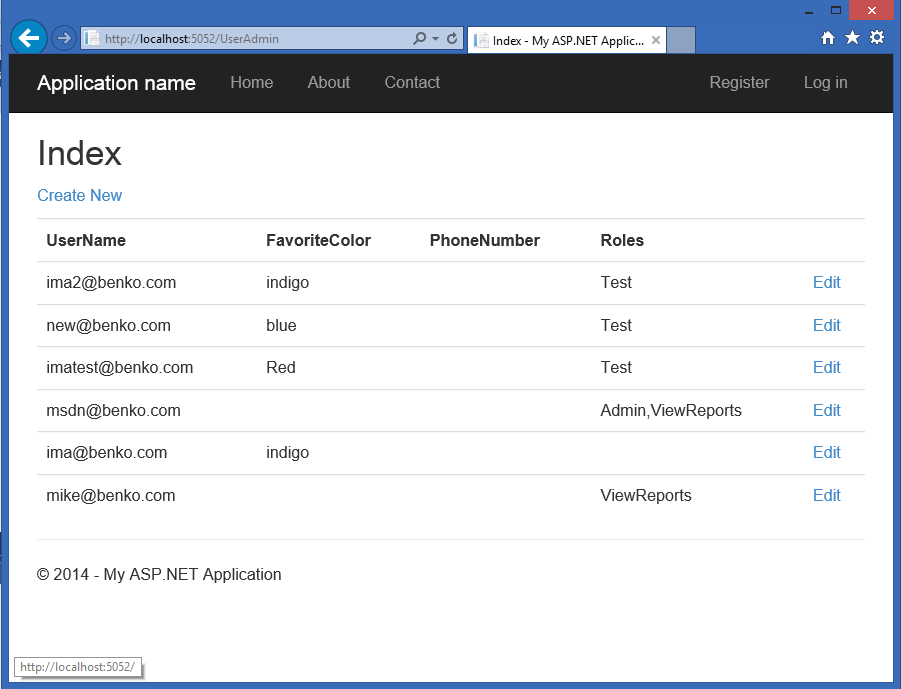
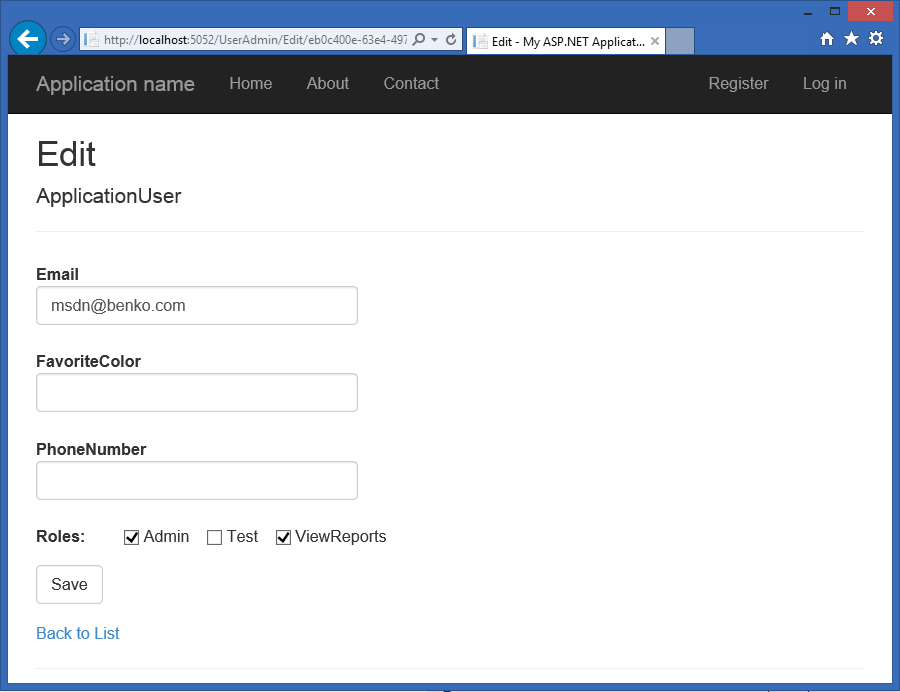
The code for the UserAdmin controller looks like this:
public class UserAdminController : Controller
{
    ApplicationDbContext db \= new ApplicationDbContext();

    // GET: /UserAdmin/
    public async Task<ActionResult\> Index()
    {
        var model \= await db.Users.ToListAsync();

        return View(model);
    }

    // GET: /UserAdmin/Id
    public ActionResult Details(string id)
    {
        if (id \== null)
            return new HttpStatusCodeResult(HttpStatusCode.BadRequest);

        var user \= db.Users.Where(u \=> u.Id \== id).FirstOrDefault();

        return View(user);
    }

    // GET: /Users/Edit/1
    public async Task<ActionResult\> Edit(string id)
    {
        if (id \== null)
        {
            return new HttpStatusCodeResult(HttpStatusCode.BadRequest);
        }

        var user \= db.Users.Where(u \=> u.Id \== id).FirstOrDefault();
        if (user \== null)
        {
            return HttpNotFound();
        }

        var RoleList \= from r in db.Roles
                   select new SelectListItem()
                   {
                       Selected \= (r.Users.Where(u \=> u.UserId \== user.Id).FirstOrDefault() != null),
                       Text \= r.Name,
                       Value \= r.Name
                   };

        ViewBag.Roles \= RoleList;

        return View(user);
    }

    //
    // POST: /Users/Edit/5
    \[HttpPost\]
    \[ValidateAntiForgeryToken\]
    public async Task<ActionResult\> Edit(ApplicationUser editUser, params string\[\] selectedRole)
    {
        if (ModelState.IsValid)
        {
            var user \= db.Users.Where(u \=> u.Id \== editUser.Id).FirstOrDefault();

            if (user \== null)
            {
                return HttpNotFound();
            }

            user.UserName \= editUser.Email;
            user.Email \= editUser.Email;
            user.PhoneNumber \= editUser.PhoneNumber;

            var userRoles \= user.Roles;

            selectedRole \= selectedRole ?? new string\[\] { };

            foreach (var role in selectedRole)
            {
                var aRole \= db.Roles.Where(r \=> r.Name \== role).FirstOrDefault();
                if (aRole \== null)
                {
                    var x \= db.Roles.Add(new IdentityRole(role));
                    aRole.Id \= x.Id;
                }
                user.Roles.Add(new IdentityUserRole { RoleId \= aRole.Id, UserId \= user.Id });
            }
            var result \= db.SaveChanges();

            return RedirectToAction("Index");
        }
        ModelState.AddModelError("", "Something failed.");
        return View();
    }
}
The views for this include the Index.cshtml view which lists the users and provides a link to edit:
@model IEnumerable<LearnNowIdentity.mvc.Models.ApplicationUser> @{ ViewBag.Title = "Index"; }
<h2>Index</h2>
<p> @Html.ActionLink("Create New", "Create") </p>
@Html.DisplayNameFor(model \=> model.UserName) @Html.DisplayNameFor(model \=> model.FavoriteColor) @Html.DisplayNameFor(model \=> model.PhoneNumber) Roles@foreach (var item in Model) { <tr> <td> @Html.DisplayFor(modelItem => item.UserName) </td> <td> @Html.DisplayFor(modelItem => item.FavoriteColor) </td> <td> @Html.DisplayFor(modelItem => item.PhoneNumber) </td> <td> @Html.DisplayFor(modelItem => item.DisplayRoles) </td> <td> @Html.ActionLink("Edit", "Edit", new { id=item.Id }) </td> </tr> } </table>
And the edit.cshtml which has a
@model LearnNowIdentity.mvc.Models.ApplicationUser
@{ ViewBag.Title = "Edit"; }
<h2>Edit</h2>
@using (Html.BeginForm()) { @Html.AntiForgeryToken()
<div class\="form-horizontal"\>
<h4\>ApplicationUser</h4\>
<hr />
@Html.ValidationSummary(true, "", new { @class \= "text-danger" })
@Html.HiddenFor(model \=> model.Id)
<div class\="form-group"\>
@Html.LabelFor(model \=> model.Email, htmlAttributes: new { @class \= "control-label col-md-2" })
<div class\="col-md-10"\>
@Html.EditorFor(model \=> model.Email, new { htmlAttributes \= new { @class \= "form-control" } })
@Html.ValidationMessageFor(model \=> model.Email, "", new { @class \= "text-danger" })
</div\>
</div\>
<div class\="form-group"\>
@Html.LabelFor(model \=> model.FavoriteColor, htmlAttributes: new { @class \= "control-label col-md-2" })
<div class\="col-md-10"\>
@Html.EditorFor(model \=> model.FavoriteColor, new { htmlAttributes \= new { @class \= "form-control" } })
@Html.ValidationMessageFor(model \=> model.FavoriteColor, "", new { @class \= "text-danger" })
</div\>
</div\>
<div class\="form-group"\>
@Html.LabelFor(model \=> model.PhoneNumber, htmlAttributes: new { @class \= "control-label col-md-2" })
<div class\="col-md-10"\>
@Html.EditorFor(model \=> model.PhoneNumber, new { htmlAttributes \= new { @class \= "form-control" } })
@Html.ValidationMessageFor(model \=> model.PhoneNumber, "", new { @class \= "text-danger" })
</div\>
</div\>
<div class\="form-group"\>
<label class\="control-label col-md-2" for\="RolesList"\><b\>Roles:</b\></label\>
<span class\=" col-md-10"\>
@foreach (var item in ViewBag.Roles)
{
<input type\="checkbox" name\="SelectedRole" value\="@item.Value" checked\="@item.Selected" class\="checkbox-inline" />
@item.Value
<span\> </span\>
}
</span\>
</div\>
<div class\="form-group"\>
<div class\="col-md-offset-2 col-md-10"\>
<input type\="submit" value\="Save" class\="btn btn-default" />
</div\>
</div\>
</div\>
}
<div> @Html.ActionLink("Back to List", "Index") </div>
In the IdentityModel.cs file for the ApplicationUser class I extended the profile information to include DisplayRoles which returns back a comma delimited list of roles the user is currently in.
public class ApplicationUser : IdentityUser
{
    public async Task<ClaimsIdentity\> GenerateUserIdentityAsync(UserManager<ApplicationUser\> manager)
    {
        // Note the authenticationType must match the one defined in CookieAuthenticationOptions.AuthenticationType
        var userIdentity \= await manager.CreateIdentityAsync(this, DefaultAuthenticationTypes.ApplicationCookie);
        // Add custom user claims here
        return userIdentity;
    }

    public string FavoriteColor { get; set; }
    // \*\*\* BENKO: In view we need a ref to Image URL
    \[Display(Name \= "Roles")\]
    public string DisplayRoles
    {
        get
        {
            string rc \= "";
            foreach (var r in Roles)
            {
                rc += GetRoleName(r.RoleId) + ",";
            }

            return rc.Trim(',');
        }
    }
    private static string GetRoleName(string p)
    {
        ApplicationDbContext db \= new ApplicationDbContext();
        return db.Roles.Find(p).Name;
    }
}
Taken together when you run the application you get a basic Admin page which allows you to assign roles to a user. For the purposes of my demo I manually added the roles to my application (by editing the database directly), and to implement the initial views I right clicked on the View() code in the controller and selected “Add View”. One note about that is that in the ApplicationDbContext the scaffolding added an extra DbSet for the ApplicationUsers which caused the error “Multiple object sets per type are not supported…”
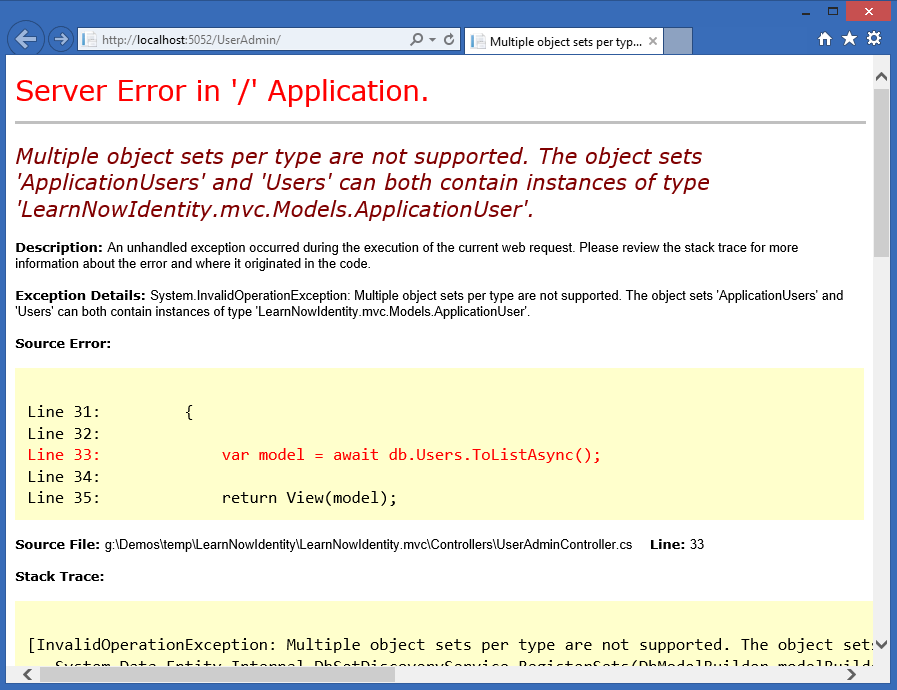
so to resolve that I had to comment out the extra DbSet as shown in the code below:
public class ApplicationDbContext : IdentityDbContext<ApplicationUser\>
{
    public ApplicationDbContext()
        : base("DefaultConnection", throwIfV1Schema: false)
    {
    }

    public static ApplicationDbContext Create()
    {
        return new ApplicationDbContext();
    }

    // public System.Data.Entity.DbSet<LearnNowIdentity.mvc.Models.ApplicationUser> ApplicationUsers { get; set; }
}
Happy Coding!