Today I’m adding some redundancy to the storage paths in our Hyper-V environment. We have 2 Windows 2008 R2 Server Core host servers running the Hyper-V role attached to an Equal Logic iSCSI SAN. Each host has 3 network cards attached the iSCSI VLAN but only 2 are used for host connections. The third NIC is being used as a Microsoft Virtual Switch Adapter on the iSCSI VLAN for the VM guest operating systems to make direct connections to the SAN and use host invisible storage.
NOTE: Host invisible storage is when a VM uses its own initiator with a virtual NIC and directly attaches to a SAN LUN. This removes the hypervisor layer I/O requirement and greatly increases performance. Also since the virtual NIC is part of the VM, there is no reason to add the LUN to the cluster storage as it will follow the VM as it moves between hosts.
First we need to install the MPIO feature.
To install MPIO on server core:
ocsetup MultipathIo /norestart
Now we need to claim all the iSCSI attached storage for MPIO (see warning before proceeding)
mpclaim -r -i -d "MSFT2005iSCSIBusType_0x9"Warning: the –r will force the host to automatically reboot with no warning so make sure you’re ready for a reboot before running this command. For a complete reference of MPIO commands as well as the available load balancing policies:
http://technet.microsoft.com/en-us/library/ee619743(WS.10).aspx
Now since my hosts already have attached storage, I’m simply going to add a second path to each LUN and leave the default Round Robin Load Balancing Policy in place.
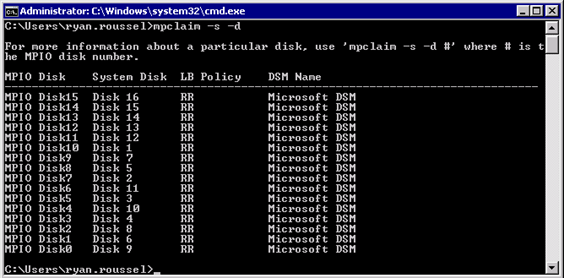
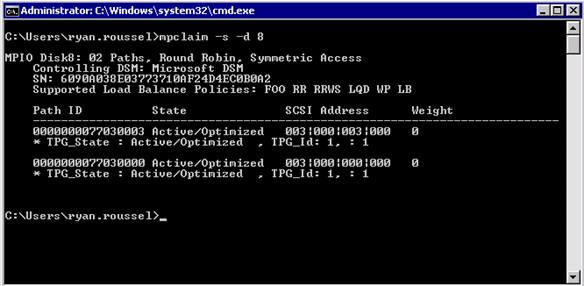
First let’s verify I’ve claimed all my attached storage. Running mpclaim –s –d shows that I have claimed all previously attached storage for MPIO. It also shows my Load Balance Policy is Round Robin by default.
Now let’s go ahead and start adding additional paths for each LUN.
We can still use the iSCSI control panel inside windows server core. To launch type ISCSICPL from the command prompt.
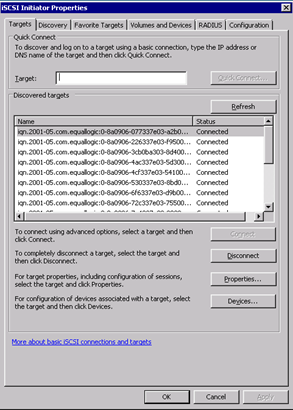
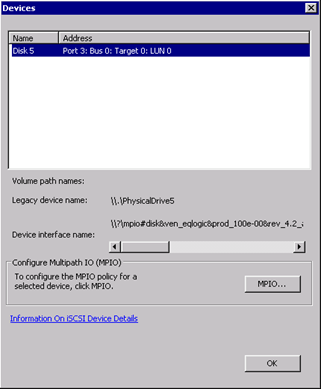
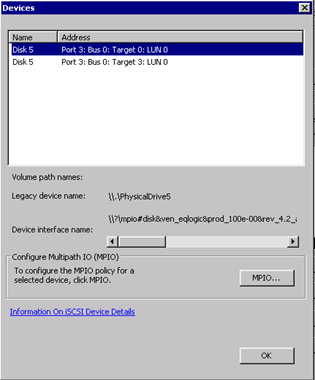
You can see all the previously attached storage. Currently each LUN is connected on a single path to the Target Portal. We’ll add an additional connection to each. By selecting a LUN and hitting devices, we can see the pre-existing path:
To add our new path, back out of the devices, select the LUN and hit connect.

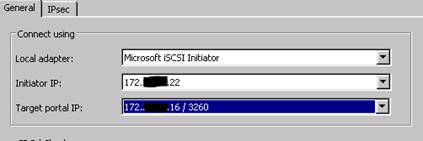
Make sure to check enable multi-path and hit advanced. Here choose your Initiator, the 2nd NIC IP address and the target portal IP. Configure any IPSEC or CHAP authentication if you have your SAN configured for it, then hit ok.
Now when I select the same LUN and hit devices again, I show both active paths:
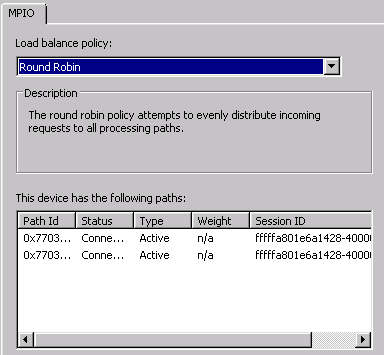
And when I hit MPIO, it shows both paths as well as the LB policy:
You can also verify at the command prompt by using MPCLAIM –S –D <device#>
And that’s it. We’ve added multiple paths to our host for this specific LUN, now to repeat the process for every LUN as well as the other host.

